How To:
Connecting ClickDimensions with WordPress Forms
BY: DAN MALGRAN
Do you need ClickDimensions Form Capture to work with Gravity Forms, Ninja Forms, or Contact Form 7 on WordPress? You’re in the right place!
As of June 2017, this is only working on WordPress versions 3.0 – 4.5.9 due to the required plugins not having updates to the latest versions of WordPress.
Are you currently using or evaluating ClickDimensions for your email marketing platform and need to know if it can play nice with all those forms you created on WordPress? Turns out, the answer is yes! But, before I get started, there are a few things you should know.
First, you will need to have the ClickDimensions tracking script on your site, and have that site within your Domains. There’s a help site post on that over here. Second, you need to understand a little bit about how ClickDimensions uses IDs to connect everything. ClickDimensions creates a browser cookie for every visitor and assigns it a unique ID, which they call the “cuvid” and “cd_visitorkey”. Without sending that ID, there’s no way for ClickDimensions to tie a visit to a contact or lead within the CRM. That’s why, if you’ve tried to connect a form to a Form Capture without sending that ID, it’s failed. Luckily, there’s an easy way to scrape that ID and send it along with your form!
In my case, my company uses Gravity Forms to create a rather large number of forms throughout our site. With no built-in integration between Gravity Forms and ClickDimensions, and no Post Action option, I was in a bit of a bind. We didn’t want to recreate every form within ClickDimensions, but we also needed to connect visits and form submissions to contacts.
In walk two plugins:
- Forms: 3rd-Party Integration by zaus, Atlantic BT, and spkane
- Forms: 3rd-Party Dynamic Fields by zaus and spkane
You will need both of these installed on your WordPress site to continue.
Assuming you already have your forms created and deployed on your site, let’s jump into getting these integrated!
Step One: ClickDimensions Form Capture
Alright, ClickDimensions covers Form Capture pretty well on their own site, so I won’t go through it all here. There are a few things to note:
- Field ID can be whatever you want, but make sure you note what you make it. You’ll need it later.
- Success and Fail URLs won’t matter, the user isn’t redirected to them when using this method. I set them to the homepage to make the system happy.
- You do not need Form Capture Fields for every single field in your form, you only need them for the fields you want to capture in the CRM (email!).
- You will need the Form Action URL later, so keep it handy.
Step Two: Inspecting Your Form Input Names
To send the right fields to ClickDimensions, we’ll need all the input names from the forms. Some form creators allow you to set this yourself, but for my examples I use Gravity Forms, which generates them automatically on a per-form basis (so you’ll need the right names on EACH form you’re connecting). You can get them using the inspector tool in your browser (in Chrome: right click on the element, select “Inspect”).
Step Three: Set Up the Service
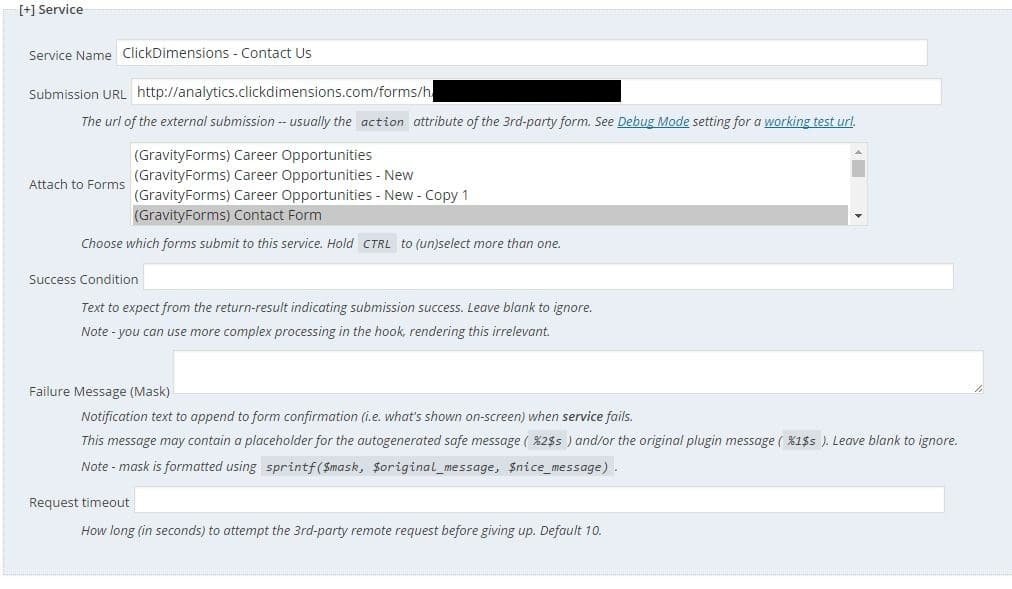
Now that you have the input names and the form action URL, it’s time to set the service up. In the admin site, a new link should have been added under Forms called “3rd-Party Services” after you installed the two plugins earlier. In the settings section, enter your email and check Debug Mode for now. That will ensure you get the debugging information when we test later. Next, add a new service and name it anything you wish (I name them ClickDimensions – Form Name). Add in the Submission URL, which is that Form Action URL provided by ClickDimensions earlier. Then select the form you’re using.
Step Four: Get to Mapping
The Mapping section is where we’ll put it all together. I suggest you get the ClickDimensions cookie out of the way first. Make sure you check the “Is Value” box. You can set the label to whatever you want, it’s for your own administrative experience. The Form Submission Field is where you’ll add the dynamic text that will grab the ClickDimensions cookie. The cookie you’re trying to add is “cuvid”, so enter: ##COOKIE:{cuvid}##. The final column, 3rd-Party Field, is asking you what ClickDimensions is expecting to see as the field name. For the cookie, it’s looking for “cd_visitorkey”, but for all the rest it will be looking for what you set as the “Field ID” in step one.
After that, map the fields you want to capture. In my example below I only added the “email” field, but any others will be added in a similar fashion.
Step Five: Test Your ClickDimensions Connection
Now that you’ve saved the new service, it’s time to test. Submit to the form you just connected and go to that Form Capture within ClickDimensions. Within the related entities you’ll see “Posted Forms” and within a few minutes you should see your submission!


Thanks for this! I followed all the steps but still having issues – seems like ClickDimensions is not receiving the data in CRM (no Posted Form is generated). Is there anything else i should look out for?
Am using contact form 7.
Hey Nicholas! You may need to add a little bit to Step 4 (Mapping). Add in another line with the Is Value checked. Label it Referer. In the Form Submission Field put the placeholder: ##SITEURL## and in the 3rd-party field put referer. ClickDimensions requires the site URL as a referer to determine that it’s coming from an approved domain.
Hope that solves it!
Thanks will give it a go!